


 |
| Ring by Giampiero Bodino |
Jewellery masterpieces. A ring by Giampiero Bodino
Tuesday, September 15, 2015

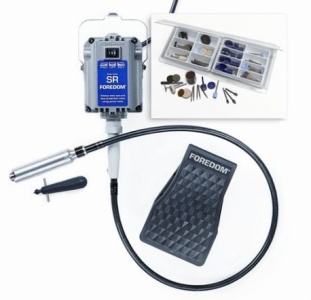
DIY. Behind the scene: watch the creation of a lampwork bead!
Tatiana of Fiery-tale is sharing the process of making glass beads today. Very interesting! Sounds like something I would like to try!
-----
I think many of you have see handmade lampwork beads before and maybe even admired them. Have you noticed that all of them were unique? Each bead is a small handmade masterpiece. Keep them for your grandchildren if you happen to get some. They will enjoy finding it in your jewelry box!
I will show you how to make a bead like that. This DIY is suitable for the beginners. It will give you a very good idea of how the beads are made and help you to make up your mind to find an instructor in your town (or not to do that if this is something you are not willing to try!)

For this bead I used the shards of glass:
006 Effetre Super Clear;
204 Effetre White;
058 Effetre Ink Blue;
128 CiM Sangre;
144 Double Helix Helios

Let's start! Light up the torch, put on your safety glasses (my blue glasses immediately transform everything around me and put me in a good mood!)
I have to start with some prep work. The glass shards come in a certain diameter, but I need them thinner to create a fine decor. I need to stretch them to make thinner.
I warm up a shard's end slowly to avoid a thermal shock and cracking. I form a small droplet that I capture with a pair of tweezers, then I start pulling it right away stretching to a desired diameter. I repeat this operation with all my shards except for the white one.

Now I am ready to create.
I take my pin with the bead release (without it a bead will stick to the pin) and a shard of white glass (204). Both need to be heated up thoroughly and carefully. The pin needs to be rotated constantly while you are working on your bead. I apply first amount of molten glass onto my pin.

I form a nice glass ball on the pin while constantly rotating it. The molten glass will drip if you stop rotating, This operation is a good exercise for your fingers!

Now it is time to give some exercise to your eyes! When you achieve the desired shape of your bead, it is time to start using one new thin shard (Sangria (128)). The surface cools down just a little bit before we apply a few drops of this new color. In this case I am making 3 flowers with 6 petals each. Therefore I need to apply new color in 18 dots (6 + 6 + 6). I continue heating up my bead while doing this. I fused them until smooth once all the dots have found their place..

I got a bead with the dots that do not look like flowers yet.

This is how I fix this. I heat up one motif and take the bead away from the torch to poke the center of the motif with my awl.

I repeat this operation for two other motifs. I keep heating the bead (and rotating!) until smooth. Now you can see that the the dots look more like flower petals.

Let's give this flower a fancy shape! I am going to rotate my flowers using colorless glass shard. I implant it 90 degrees to the surface into the center of one of the flowers and spin it with my fingers, then repeat for other two flowers.

I decided to add three baby blue color flowers (058) with tree petals each. The procedure is the same as we have done for our big flowers. I just skipped the last step so the petals do not turn on them.

So we are at the finish line. Let's add our bead charm (and drama!) by adding a few golden 3D dots. I use glass shard with the color called Helios (144) for this. This glass shard contains a decent amount of actual silver and requires to be treated accordingly.

It is time for a fire-show! We need to do a trick in order for Helios to show its silver color. I have to cool the bead down a little bit. Then I increase the propane and just "brush" my bead with it. Our job just has been completed if the 3D dots had turned silver. Congratulations!

The bead needs to be stabilized. We let it hide in our kiln for 10-12 hours until it cools down completely. Then the bead can be taken off the pin.
I hope you enjoyed this as much as I did!
Tatiana's Shop (in Russian)
Tatiana's Blog (might be easier to contact her here if you are interested in her work)


Ring. Behind the scene.
Friday, September 11, 2015
Today I would like to share a story of this ring creation. This is a very unusual story and this is very non-typical of how I usually design jewelry. We were about to move to a new home and I was just about to close my etsy shop and to start packaging my tools, when a customer contacted me and asked for a ring.
She registered just to buy a ring from me (if I understood right) and I felt being responsible (not her fault!) of helping her and giving her a great experience of buying through Etsy. Of course, I also was short in time and tried to do that fast.
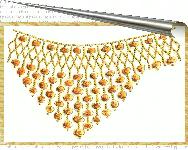
She asked for a ring that would be similar to this one, but smaller in diameter. The pearl needed to be on a side and possibly set on a leaf or a petal.
Since I tried to make her fast, I did not do any sketches and went ahead with the description! (I know, that was silly!). No wonder that this has been the outcome:

No wonder she was not impressed! :) I tried to change the design a little bit. Here is the picture:

I do not think I ever showed it to her. I was not satisfied. I also was one day too late to start packaging. Trying to still give her a good experience and finish the project as soon as possible... I changed the design completely and published it in my Etsy shop. I assured my customer that she should not feel obligated to buy it if that was not what she expected.

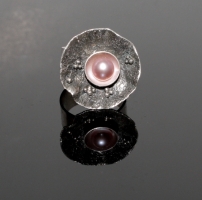
Since she was not sure, I wished her best luck with another Etsy shop and closed my shop for three weeks that I needed for our moving. All my tools were still out. I thought it would not hurt to re-design the ring again... as I needed to try and sell it later. This is how I changed it the last time:

Now I loved it myself and thought I would be totally fine if I never sold it... but I gave it a chance, since I already had my own ring in this style and did not need the second one.

I am happy, that two years later it has found an owner! Bye-bye, lovely ring, have a happy life! :)

Jewellery masterpieces. A hummingbird ring by Boucheron
Thursday, September 10, 2015
 |
| Hummingbird ring by Boucheron |
Throwback Thursday
 |
| Puffing Billy, Melbourne, Australia, 2011 |
 |
| You are actually allowed to sit like this! Well, it is only moving 10 km/h (3 miles)... still! I'd probably have been ok, but I did not dare :) |
TOP10 most unusual up-cycled jewelry organizers
Wednesday, September 9, 2015
You do not have to give the legs to your old grater to turn it into a jewellery organizer... but you are creative, right? So, why not? Why stop at this either? Maybe a couple of wings too? :)

Love this idea! Some assembly required, but it is worth it, I think!

Old shower hooks can be up-cycled too! I would not think of this, to be honest, but it works.

This one is my favorite!

Not sure what it is... possibly the back of a bed. Looks rusty too... Well, if you like up-cycling that much... I would suggest to paint it as jewelry needs to be kept on a clean organizer. Rust is not good for it either.

Another awesome idea!

Not any tree brunch would work for this. Looks like a piece of wall art, though!

Simple and lovely:

This is one creative organizer! (You can tell your guests that you've bought all those corks at a craft store!) :)

If your rake got rust on it... buy yourself a new one! This one you will need for a rustic home decor :) (after you clean and paint it of course)

All pictures are from my inspiration board. Visit to discover even more ideas:

Subscribe to:
Posts (Atom)