

 Posts
Posts


 |
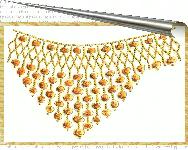
| Beaded necklace by Alla Maslenikova |


Ring. Behind the scene.
Friday, September 11, 2015
Today I would like to share a story of this ring creation. This is a very unusual story and this is very non-typical of how I usually design jewelry. We were about to move to a new home and I was just about to close my etsy shop and to start packaging my tools, when a customer contacted me and asked for a ring.
She registered just to buy a ring from me (if I understood right) and I felt being responsible (not her fault!) of helping her and giving her a great experience of buying through Etsy. Of course, I also was short in time and tried to do that fast.
She asked for a ring that would be similar to this one, but smaller in diameter. The pearl needed to be on a side and possibly set on a leaf or a petal.
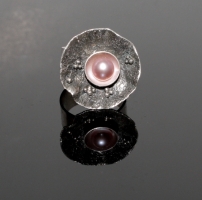
Since I tried to make her fast, I did not do any sketches and went ahead with the description! (I know, that was silly!). No wonder that this has been the outcome:

No wonder she was not impressed! :) I tried to change the design a little bit. Here is the picture:

I do not think I ever showed it to her. I was not satisfied. I also was one day too late to start packaging. Trying to still give her a good experience and finish the project as soon as possible... I changed the design completely and published it in my Etsy shop. I assured my customer that she should not feel obligated to buy it if that was not what she expected.

Since she was not sure, I wished her best luck with another Etsy shop and closed my shop for three weeks that I needed for our moving. All my tools were still out. I thought it would not hurt to re-design the ring again... as I needed to try and sell it later. This is how I changed it the last time:

Now I loved it myself and thought I would be totally fine if I never sold it... but I gave it a chance, since I already had my own ring in this style and did not need the second one.

I am happy, that two years later it has found an owner! Bye-bye, lovely ring, have a happy life! :)

Jewellery masterpieces. A hummingbird ring by Boucheron
Thursday, September 10, 2015
 |
| Hummingbird ring by Boucheron |
Throwback Thursday
 |
| Puffing Billy, Melbourne, Australia, 2011 |
 |
| You are actually allowed to sit like this! Well, it is only moving 10 km/h (3 miles)... still! I'd probably have been ok, but I did not dare :) |
TOP10 most unusual up-cycled jewelry organizers
Wednesday, September 9, 2015
You do not have to give the legs to your old grater to turn it into a jewellery organizer... but you are creative, right? So, why not? Why stop at this either? Maybe a couple of wings too? :)

Love this idea! Some assembly required, but it is worth it, I think!

Old shower hooks can be up-cycled too! I would not think of this, to be honest, but it works.

This one is my favorite!

Not sure what it is... possibly the back of a bed. Looks rusty too... Well, if you like up-cycling that much... I would suggest to paint it as jewelry needs to be kept on a clean organizer. Rust is not good for it either.

Another awesome idea!

Not any tree brunch would work for this. Looks like a piece of wall art, though!

Simple and lovely:

This is one creative organizer! (You can tell your guests that you've bought all those corks at a craft store!) :)

If your rake got rust on it... buy yourself a new one! This one you will need for a rustic home decor :) (after you clean and paint it of course)

All pictures are from my inspiration board. Visit to discover even more ideas:

Jewellery masterpieces. Fine jewellery by Mario Buzzanca
Tuesday, September 8, 2015
 |
| Polar bear pendant by Mario Buzzanca |
DIY by Katya Ryazanova. Stained glass painting in a free-style
This will not be a traditional DIY. It is rather an invitation to the happening. Fans and newbies at the stained glass painting, I am offering you to get carried away by the free-style painting on glass.
I had enough of playing with decoupage and rose ornaments. Now I want to do something light and organic .. I am turning a glass in my hands... and pictured .. Fire and Feathers!
I have different stained glass paints from different manufacturers at my hand. So it is going to be as organic as it gets!
Tools and materials:
- A glass (or two... or three!)
- Stained glass claques ArtGlass by Marabu
- Paint Decoglass by Ferrario (this is a paste allowing you to create three-dimensional texture on the glass)
- Stained glass paints Gallery Glass of Plaid
- Stained glass paint Glas-Effekt-Gel by VivaDecor
- Alcohol or nail polish remover (for degreasing the glass)
- Spatula (to create textures on stained glass using paste by Ferrario)
- Thin synthetic brush (for applying stained glass alkyd based lacquers)
- White spirit for cleaning brushes

I am working on the two glasses at the same time here. You can use the materials that you have. You can work with any glass vessel.
Degrease the surface of your glass with nail polish remover (alcohol-based one). I love materials that allow me to create texture. I squeeze out a little bit of the stained glass paste (by Ferrario) and use my spatula to create what is going to be the surface of my glass. Strokes lead in the same direction. I am trying to show the details in my picture here... However, photographing the glass proves to be a special art .. I still need to get that skill...


Paint dry up and become brighter and more transparent. Red looks a lot beeter after drying. I am already liking it )


I apply stained glass paint drops "golden pearl" by Plaid on the brown layer. Then add blue paint by VivaDecor. Both manufacturers made my life a lot easier by making a thin tip on their paint tubes. We do not need a brush anymore and can just the paint straight to the surface. You can use a toothpick to help yourself. Note that I am keeping the direction of the brushstrokes! The photo shows how I put the brushstrokes of different colors.


I am adding turquoise color by VivaDecor here:

I decided to add yellow color to this fiery red... then black and green. Black drops are down below and a little bit of green for drama... Then yellow feathers on top.

I am using stained glass paints ArtGlass by Marabu. Stained glass paints (alkyd based) should be applied by a small synthetic brush. Natural hair brushes cannot survive through this and will shed! Also do not take a brush with long tip. You need to use just the tip of your brush. If the tip is too long it will dry up and become contaminated.

This is the the outcome of my fire and feathers idea. I decided to enhance the yellow color. Stained glass paints dry quickly creating a bright thin transparent layer. They do not require baking. I applied the second layer right over the first one. Oh, wow! It turns out you can not do this.. unless you wish for craquelure to happen!!! Lucky for me, I do love craquelure, so I am happy! :)


My glasses were reborn as the candle-holders! I will call them Yin and Yang))

I sealed my work with the stained glass sealant by Plaid. If you are using the water-based paint, you can bake them (if the manufacturer recommends). Since I used different colors in the same work, I decided not to risk and to stick to the sealant only. Stained glass paints (alkyd based) do not require baking.

These glasses can be washed in cool water without abrasives.
Do not be afraid of being creative!
Katya Ryazanova
Katya wrote a few guest posts for the blog. You can find all her DIY posts here.


Subscribe to:
Posts (Atom)