Xenia Emelyanov makes wonderful polymer clay jewelry. She generously shares her instructions with her followers. Here is a DIY instruction on how to make a cute fox key chain pendant. Here and
here you can find her other guest DIY blog posts.
Dear friends, I am pleased to share my new master class with you!
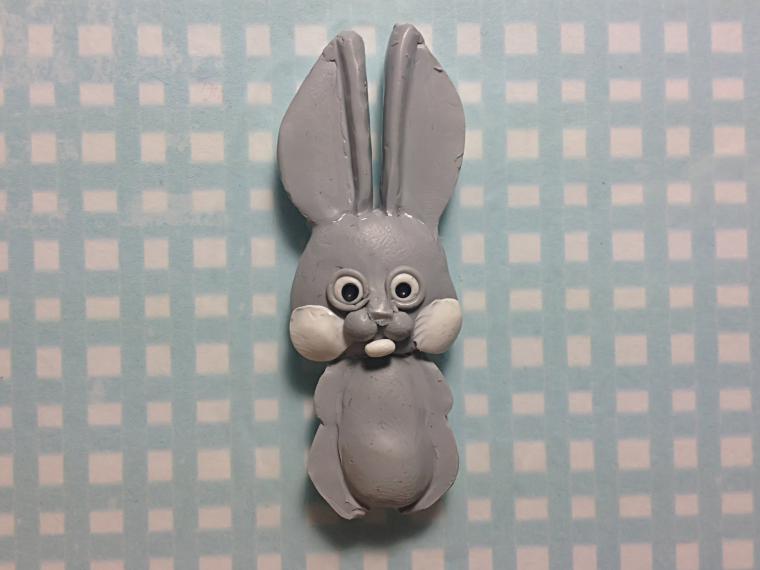
Today I'll show you how sculpt a bunny :)
You can make bunny earrings, a pendant, a keychain, a fridge magnet, a mug decoration or a Christmas tree decoration. Possibilities are endless!
I hope this instruction will help you to understand the process of sculpting well enough to make bunnies with different facial expression and paw position to create unique bunnies :)
Let's start!
You will need:
- polymer clay: black, white and red;
- carving tools;
- x-acto knife;
- glass baking dish;
- lacquer;
- accessories.
Take white and black polymer clay (more of the white and less of the black clay) to make light gray color. Mix them up thoroughly to get an even color.
Roll out a 3 mm thick sheet. I make a solid base for my figurines as all the parts are holding together better that way. You can insert wires for even stronger base. It is not necessary, though.
Sketch a bunny on a piece of paper or print it out. Cut it out along the contour.
Use your x-acto knife to carefully cut out the bunny out of your clay sheet.
Add volume to your Bunny by adding some clay to its head, body and ears.
Smooth out the edges. I've found a handy tool for this operation in my make-up box :) (one of my nail tools)
Impress a boll point carver where the eyes are going to be.
Insert two whites into the bunny's eyes.
Add two white tiny pancakes to make the bunny's cheeks and smooth them out.
Add two gray semi-spheres on the face (there will be the mouth) and then add the nose.
Make a small oval out of white plastic. This is going to be the bunny's lower jaw.
Roll out gray clay and attach it around the eyes.
Take the black clay to make the pupils, add the white "highlights" if necessary.
Make the brows. Note that the bunny's expression depends on the brows position.
Use white clay to sculpt the chest and smooth it out.
Make a tiny pink triangle for the bunny's nose. Use a needle to impress the nostrils and draw a line under the nose.
Then make the paws.
Roll out the pink clay, cut it into two halves and lay them inside the ears. Flatten them slightly and spread it so there is no clear boundary between the colors.
Impress the ball carver near the corners of the "mouth" to give it a smile. Form the feet fingers.
Add pink pads on their feet.
Check the symmetry, the quality of the smoothed joints and other details. Start working on the fir texture if you are satisfied. Look at the pictures of real animals to make your bunny look realistic. Draw short hairs around the nose (the direction is from the nose towards the edges of the face). The farther away from the nose the longer the hairs.
The chest hairs' direction is from the center towards the edges. This will give a visual dimension.
Do not forget to make the little fingers on the front paws. Finish drawing the fir where it is missing still.
Bake the finished bunny following your polymer clay instructions. Varnish the bunny's nose and eyes when it has cooled down completely.
The bunny is ready! :)
I hope this project inspires you to start working with the polymer clay!
Slide show to watch how the bunny is changing.