


Alia from the "Base of Art" shared a fantastic DIY project with my blog followers. It looks complected, doesn't it? It is easier than you think! You need some free time, a little bit of concentration and possibly a cup of tea to relax. This is boho, baby, you do not need to be perfect! :)

Hello all! My name is Alia. I would like to share this DIY on how to imitate lace with the painting. This technique can help you to decorate pretty much any object and give it a boho look.

I used:
- a decoupage card «Dreams of Paris» of A3 size (from the «Base of Art»),
- a blank wooden circle 30 cm in diameter,
- sand papers,
- a clock mechanism with the hands,
- acrylic paints,
- water base stain,
- glue suitable for decoupage,
- acrylic contour paints,
- an acrylic lacquer.
- a blank wooden circle 30 cm in diameter,
- sand papers,
- a clock mechanism with the hands,
- acrylic paints,
- water base stain,
- glue suitable for decoupage,
- acrylic contour paints,
- an acrylic lacquer.

Sand the wooden circle with the sand paper, then stain it with the "chestnut" color stain. Add a bit of blue acrylic paint into your stain if you wish to achieve a darker color.

Cut our a picture out of your decoupage card. Find and mark the center.

Soak your card in water for 2 - 3 minutes at a room temperature.

Now you can glue the picture to the wooden circle. Apply glue, then put the picture on it and cover it with the glue again, then place a plastic file folder. Use a roller and a brush to get rid of the air bubbles. Brush from the center towards the edges. (Note that the picture needs to be carefully placed at the center of the wooden circle)

Wait for the card to dry thoroughly, then coat the whole piece with the acrylic lacquer. Make three coats. Sand the surface when the lacquer is completely dry. Use sand paper #800.

If your picture is not a perfect circle, you can fix it. Cut out a circle in a white piece of paper. The cut out should be the exact shape that you want to achieve (a perfect circle in this case). Place it over your picture. You will see the brown rim around it that needs to be disguised. Use the acrylic paints that you can mix to match the picture palette: white, burnt sienna, blue, green, quite a bit of yellow. Use a sponge to apply the paint.

Use a thin brush to paint any lines that need to be continued on this newly painted field:

Coat your work with two layers of varnish when the paint dries.

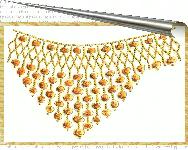
Now we can start painting the lace with the dots. It is comfortable to hold a tube of paint like a pen, under a slight angle. Your hand needs to rest on a support so it is stable and does not shake. Make dots all around the new circle. Try and make tiny dots of the same size. Place them as close to each other as possible.

These dots are the foundation for future lace.

Use a ruler to make sure you are going to paint a nice and symmetrical lace. Draw the lines with the contour paint:

Dilute the white paint with water and fill the space between two contour lines. You should get a transparent white color. Wait util the paint dries completely and evaluate the result, add another layer if the paint is too transparent.

Use your imagination and add more ornaments with the dotted lines. You do not have to use just white paint. Add gray, light silver and pearl color paints to make your work more interesting.


Use a thin brush with a short nap to draw the folds:


Fill the newly drawn lines with the diluted white paint again. It is important to maintain the translucency of the color.

Add a drop of water into a drop of the black paint. Pick it up with your brush and touch a paper towel with it to get rid of any extra water. Use this semi-dry brush to paint the shades around your lace. This way you will give your work a dimension.


Continue to paint the dotted ornaments:

We are making a clock, so we need to draw nice fat dots instead of the numbers so we can tell the time:

Draw thin lines that will marry your picture and the lace ornament:

Use semi-dry sponge to apply some white dust on the edges of the clock (this is optional). To make a semi-dry sponge, beat it against an unwanted piece of paper first.
Coat your work with tree layers of varnish when the paint dries.

Drill a hole for the clock mechanism and assemble your clock. Decorate the hands with the dotted lines.

We hope that this boho project will help you to add a romantic touch to your home decor!
Alia from the "Base of Art"


0 comments:
Post a Comment