


 |
| Party nail design by Roza |


Behind the scene. Watch the creation of tatted jewelry by Elena Larina
This guest post is courtesy of Elena Larina, a jewellery artist working in the tatting technique.
-----
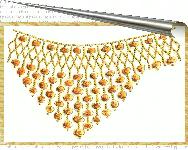
Hello all! Today I will show you how I am creating this evening jewelry set:

I chose skarn cabochons for this set. The technique that I work in is called tatting that is a hand-woven lace with seed-beads and beads. Usually I start creating with choosing my stones. I had a matching pair of skarn cabs and one more that was very similar in shape and color to my cabochon pair.


Now I had to weave the lace that I sketched. Here is my first try:


Here I tried to sew it into my lace element:

I did not really like it... Here is the corrected design:


Here is the result:


Now I am satisfied and can think about making the chain.

It is time to attach a clasp to the necklace and ear hooks to the earrings.


These updated studs are being glued and sewn to the earrings:

Now I like how the earrings hang!


The set is for sale here. The necklace and earrings can be purchased separately too.
-----
Hello all! Today I will show you how I am creating this evening jewelry set:

I chose skarn cabochons for this set. The technique that I work in is called tatting that is a hand-woven lace with seed-beads and beads. Usually I start creating with choosing my stones. I had a matching pair of skarn cabs and one more that was very similar in shape and color to my cabochon pair.

I have long wanted to make an everyday and low-key piece of jewelry. And here I am... looking at these pretty stones that are impossible to resist. Without any hesitation I decided to make a set of earrings and a pendant. An approximate sketch was born quite quickly.


Though initially I thought that I would make a modest everyday set... this version seemed too plain. I decided to add a little bit of black lace with silver-plated beads. Here it is:

Here I tried to sew it into my lace element:

I did not really like it... Here is the corrected design:

This is better! You probably cannot quite see what it is going to look like at the end. However, I already know that this is just what I wanted to achieve! Now I need to weave two more lace elements just like this one. It is also time to set the stones.

Well, cabochons are set in leather and secured with the seed beads. The next stage is embroidering the lace with the beads and attaching it to the stones.

Earrings are almost ready. All that is left is to attach a clasp. This can wait though. Now I need to weave a chain for the pendant. Pendant? Really? :) It came out way too festive... Plans have changed! So, this is not a pendant anymore... This is a necklace! Then it is too early to work on the chain. First I need to weave two more elements to go on both sides of the pendant.

Now I am satisfied and can think about making the chain.

It is time to attach a clasp to the necklace and ear hooks to the earrings.

Everything seems to be ready. Let's see what it looks like in my mannequin's ear, then I can take pictures and upload them to my web-site.

Oh, no, I do not like this ear hook! It should be a stud. This is how I am going to attach them:

These updated studs are being glued and sewn to the earrings:

Now I like how the earrings hang!

Would you agree that is better now?
The set is ready. Does anyone still remember that I wanted to make an everyday piece of jewelry? I I do not! ))) I got a chic evening jewelry set in black, white and silvery colors. Now I need a name for it. I reminds me of the actresses from the black-and-white movies... I am going to call it "Nostalgie"!

The set is for sale here. The necklace and earrings can be purchased separately too.
Elena Larina
Skype: ogonek1965
All guest posts by Anna
Sunday, August 30, 2015

Anna is a wedding accessories designer. She also has a passion in cooking and home decor.
All Anna's blog posts
Recipes:
Behind the scene:

Are you trying to be modern or old-fashioned?
Friday, August 28, 2015
Very modern, isn't it? You can find them for just a few cents or you can spend hundreds of dollars and get a ring made of gold and diamonds. You will look hip, fashionista and contemporary...
 |
| Predator rings |
 |
| Chinese Queen CiXi ( 29 November 1835 – 15 November 1908)) – Qing Dynasty |
Just kidding! Who remembers this now?! :)
Throwback Thursday
Thursday, August 27, 2015
This picture was taken at the Sidney nature park. The eggs were behind the glass and it was not easy to get through other curios visitors to take a picture :)
 |
| Should we call them cute? |
Jewellery masterpieces. Maeni Gioielli fine jewellery
Wednesday, August 26, 2015
 |
| Meini Gioielli’s traditional Firenze-made jewels employ traditional Renaissance-era techniques and designs. |

Perfect Oatmeal Cookies
These perfect cookies are soft in the middle. Preparation time is 2 minutes, according to Anna, the recipe author.
You can see all Anna's guest posts here.

Ingredients for 12 cookies:
Sugar - 1,7 oz (50 g)
1 egg
Baking powder - 0,5 oz (15 g)
Wheat flour - 6,3 oz (180 g) - 1 glass
Oatmeal - 6,3 oz (180 g) - 1 glass
Butter - 4 oz (120 g)
Toppings (all at once or just what is desired):
Ground Cinnamon
Vanilla
Dried fruits
Chocolate
Nuts
1 Butter must be soft; room temperature. Mix all ingredients with a mixer or a spoon. Add toppings. My favorite is a little bit of cinnamon, chopped prunes and coarsely crushed hazelnuts.
2 Lay baking paper in your baking tray. Scoop the dough with a spoon to make cookies and arrange them in your tray. You should get 12 cookies. Make them approx. 1/4'' (0.5 cm) in thickness. They will slightly increase in size while in oven.
3. Preheat oven to 350F and cook them for 15 minutes.
Bon appetit!
Jewellery masterpieces. Michael Weggenmann jewellery
Tuesday, August 25, 2015
 |
| Ring in black steel with white gold and 2 cts. t.w. diamonds; Michael Weggenmann |
DIY. Jewellery box for the wedding rings
Here is one more fantastic DIY by a fine artist Katya Ryazanova. Katya wrote a few guest posts for the blog. You can find all her DIY posts here.
***


***
Tools and materials:
- wooden box,
- a decoupage card or a paper napkin with an ornament,
- a shaped element made of cardboard (tag),
- brown and ivory acrylic paint,
- matte acrylic lacquer,
- "Dimensional Magic" by PLAID (or super-glossy lacquer),
- a piece cotton or linen lace,
- a piece of canvas (or any kind of natural rough fabric)
- a piece of candle wax or beeswax,
- a painting rush,
- bituminous varnish (optional),
- A bit of batting (or any pillow filler),
- glue for cardboard and wood,
- sandpaper,
- thread and needle,
- A small Phillips screwdriver.

The first thing you need to do is to remove all metal accessories from the box. Carefully unscrew the hinges and the lock. Put them aside. You will re-attach them later.
After that stain all the wooden parts with the brown acrylic paint. Stain all the corners and spots that could get darker naturally over time. Do not get carried away; paint along the grain. Leave the box to dry then wax the painted spots. Gently rub the excess wax with your finger. It will form tiny rolls that is easy to remove.
Now it is time to paint the box with the ivory acrylic paint. Leave it to dry. If the paint is not opaque enough and the brown color still can be seen, then apply another layer of the ivory paint. Let it dry well.
Take sandpaper and go over the box with it. The ivory paint will start showing the brown color that is under it (just where it was waxed). Slightly scratched it with your finger nail if you want to show more brown color. Try not to overdo it, otherwise you will have to re-paint it.

This is what you should get:

Let's make a decorative element for the lid. Paint your shaped tag with the ivory acrylic paint on one side. Let it dry, then glue your motif on the top. Trim the edges.

Make your prepared decoupage card (or napkin) wet. Make sure it is all smooth and all the air pockets are removed (use a brush to remove them). Then apply a coat of acrylic lacquer. Let it dry well and apply a couple more coats of the lacquer. You can polish the box with a sandpaper when the box gets dry. Apply one more coat of lacquer after that.

Now you may work on the aging of your shaped tag. I use bituminous varnish, but you can also use brown acrylic paint. I have an old synthetic brush for this process. I scoop a little bit of the bitumen and leave it to dry on the brush for about 15-20 minutes. Then I "wipe" the brush with the bitumen against the edges of the tag. Excess bitumen can be removed with a cotton stick wetted with the white spirit.

It's time to re-attach the accessories back onto the box using the same screwdriver.

Here is my favorite glue that can glue anything and it has no color. You can also use E6000 or a transparent epoxy glue instead. Another bottle is the "Dimensional Magic" from PLAID that allows to create a lens-like transparent layer.

Apply some glue to the back side of the tag, place it on the lid and press it tightly. Excess glue can be removed with a toothpick. Then leave it to dry well.

It's time to take care of the interior decoration of the box. Let's sew a small decorative pillow!
Take a piece of fabric of an appropriate size (I had a 4,5''*4,5'' for the box that was about 3,5''*2''*2''). Fold it in half; face inward, and sew the edge opposite to the fold. Turn it out. We got a tube!

Stuff it slightly and sew one open end. Finish stuffing and try to see how it fits the box. Sew the second open end together.

Cut an appropriate piece of lace and wrap it around your pillow. Carefully sew the lace onto the pillow.

Place the finished pillow in your box:

It took me all day to get to this point. The daylight is gone and the next picture is taken under the electric light. Now I am making the "lens" using the PLAID product. Apply it from the edges toward the center. The layer should not be too thin (you can use just a lacquer if you like a thing layer). Be careful not to let it spill over the edges. Leave it on a flat surface to dry for 4-5 hours.

Here is my finished box:

Katya's etsy shop: https://www.etsy.com/ca/shop/KatyaCoil
Katya's shop for the Russian-speaking customers: http://www.livemaster.ru/coil


Monday party nail designs by Roza
Monday, August 24, 2015
I am not a big fan of green nails, but this color I would go for!


Behind the scene. Sketchbook by Tanja Russita
Sunday, August 23, 2015
Tanja is a fine artist. You can see her previous guest post where she was showing how she has created a custom book here.
Have you ever wondered how does an artist's sketchbook look like? Tanja will show you hers!
-----
I've finally fallen in love with the sketchbooks and often carry a few of them at a time and sketch everything I see in them. This made me wonder how some artists manage to publish their sketchbooks in their web-sites, that are just scanned and only slightly retouched. My attempts to fill a sketchbook with the drawings worthy to be shown in the Internet keep failing.
I've scanned a few pages from one of my sketchbooks to show what I mean. I took a couple of sketchbooks to our trip to Alikante and filled one and a half of them with the sketches, that was 60 pages. I can show only 17 of them as other 43 are not worthy showing at all.
Let's start with the most decent and complete sketch. It is an imprint of my hand that I sketched at the beach. It is drawn very thoughtfully and carefully, because my son Jasha was sleeping on my laps and I had nothing better to do at that moment:

Now I will show a few pages in order. First of all, if I sketch what I see, it will probably be a portrait of Sasha with Kindle in a position like this one:


I also can do some sketching when we are at a playground. I love sketching ears and noses (Sasha is my usual model for these sketches). The ears are my fetish, but I am rarely happy with how they turn out in my drawings. I usually try again and again... This does not help me to achieve my goal to create a beautiful sketchbook for showing it in my web-site! ...and the architectural elements with their right corners are not helping either... and that fish is not working out right away also...


There are also other children at the playground. They are good sketching objects too with their scooters! I managed to sketch one before they were gone. Somehow this page got filled with some ladies and some legs in the meantime:


Suddenly, a notebook is taken over by my daughter. Well, I cannot really reject her when she is having a creative moment!

Sometimes I would draw a few dramatic guys in a tram, then my kids would come and take over the sketchbook again:

The most usual situation is when one successful sketch of some old man counterweights by four unsuccessful ones:

Here is another typical page that is full of not so great sketches. I am happy with only one little sketch (that face of a person who was passing by). Should I show the whole page in this case?

The same is here! There is one successful tiny sketch and a portrait that is detailed, but not that great. There is also a note here:

I went on a drawing trip to sketch these ficus trees. Are they successful or not?

Speaking of men, here is Sasha's father. By the way, he is quite recognizable:

Immediately a profile of some castle is wedged right in. Why is it here? It is just a simple sketch that and I do not consider necessary giving the whole page to! It would be just a waste...
Here are two pictures on this page that need to be looked both ways at. You look at one picture, then you would need to turn it upside down to look at another picture. It is sleeping Jasha's hand and some guy resting on a bench.


Well, here are a few pigeons in the end. One of them maybe is worth keeping:

How do other artists manage to create a masterpiece blog post out of their sketchbooks?!
Tanja's web-site: www.tanjarussita.com
Books in English and Russian that Tanja sells on Amazon: http://www.amazon.com/Tanja-Russita/e/B
Eight books in Russian: http://www.labirint.ru/books/479911/
Subscribe to:
Comments (Atom)